


How To Trade With Stops
Setting Target Price And Stop Out Limits.

Traders, it has recently come to my attention that some of my followers are not familiar with how I set my target prices or stop-out levels. Some are also not aware of how to set these on their own platforms. I’ve had several private messages requesting a review of how to do this. The thought actually had not occurred to me that some of you were not aware of how to read the TP/SL’s from my spreadsheet and apply them to your own trades until I recently received these requests. In fact, I’ve even had paid members drop membership, stating that not enough information had been supplied on this topic. I recognize that people will come and people will go, but I hate to lose followers due to frustrations in following my strategy. Thus, I thought it appropriate to create a post specifically focusing on a review of my trade strategy and how to set your levels after I post my alerts.
First, let’s review my trade strategy …which is quite simple.
I enter a trade based upon a good trade setup or when alerted by my indicator combo and immediately post the alert here.
The majority of my trades will be a 1:2 risk-reward ratio, meaning that for every dollar you risk, you stand to gain 2.
Therefore:Target Price (TP) will always be at least 2x more than the Stop Limit (SL) and
I will always post at least an estimated TP and SL on my spreadsheet.
If you don’t see these or if something looks wrong, please feel free to reach out to me in chat or DM. Since I enter all of this data manually, I sometimes make errors or fat-finger the input.
As an alternative, TradingView offers the Long Position and Short Position tools so that you can draw it out on your chart from your entry price at whatever rrr you like.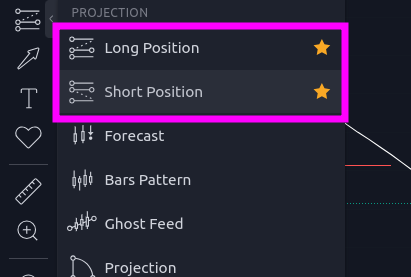

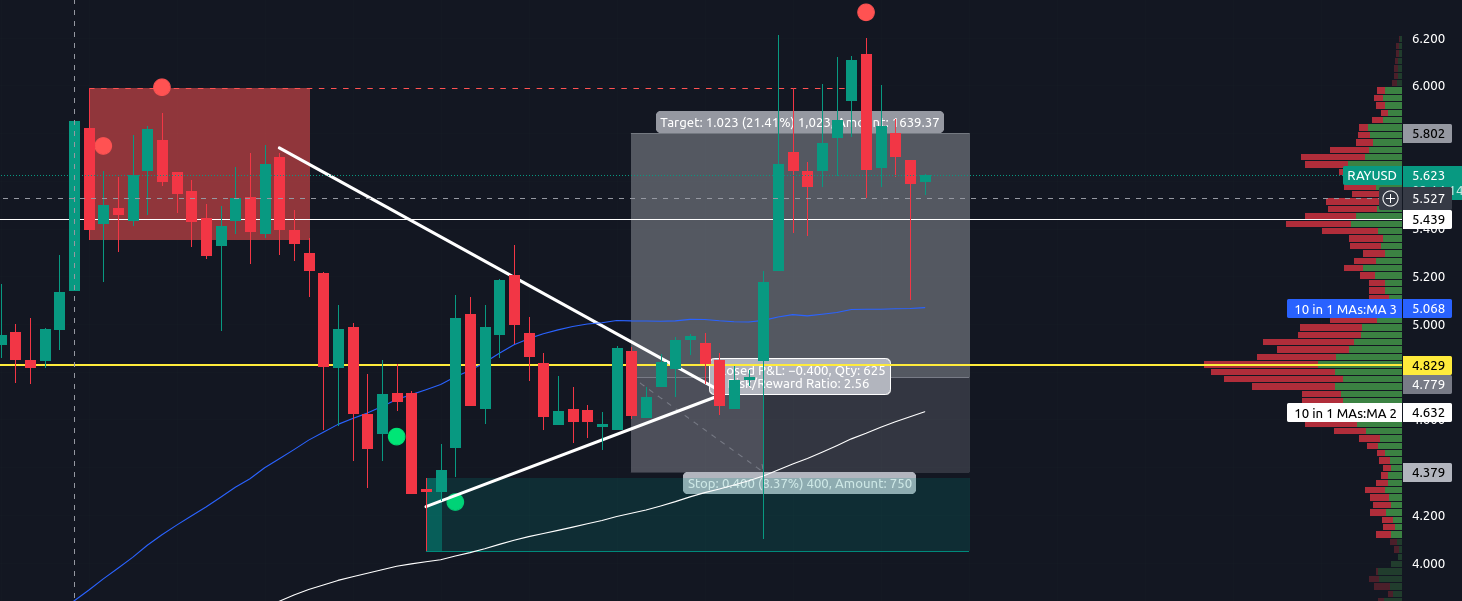
Below is an example of a recent trade we made on Raydium. I expected us to exit the triangle to the upside (which we did) and hit a target of $5.80 (which we did). My entry was $4.77. And my stop-out was $4.37. The rrr on this trade was actually 1 to 2.5 vs. the normal 1:2. We met that price and exceeded it.
Once my target is hit, I almost always have a sell order in place to take half off the table for profit. I then raise my stops and let the rest ride until I get a sell signal or my new raised stop is hit. You may adjust your strategy according to your own risk tolerance. But I always try to keep the spreadsheet up to date with new stop limits and/or target prices. I also notify my followers in at least the chat section when this is done.
Now, let’s get onto how to set your TP/SL.
So for this part, it is important to note that different exchanges might look a little bit different or use different terminology. Overall though, the concept remains the same. And since I was specifically asked about how to set these on Coinbase, I will use this exchange for my illustrations.
In Coinbase, you will have to toggle to the “Advanced” trade section. In the bottom left of your screen you should see this:
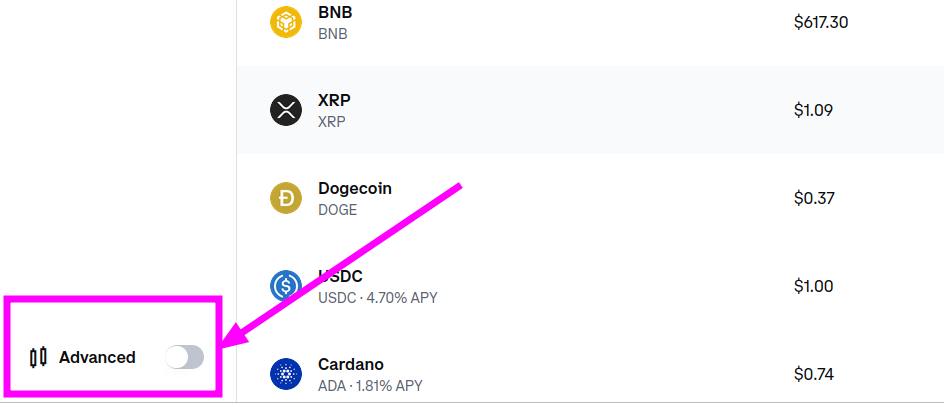
Hit the toggle to enter Advanced mode.
Now, once you buy a token, you obviously will have the option to sell. So, over on the right of your screen hit the “Sell” tab:
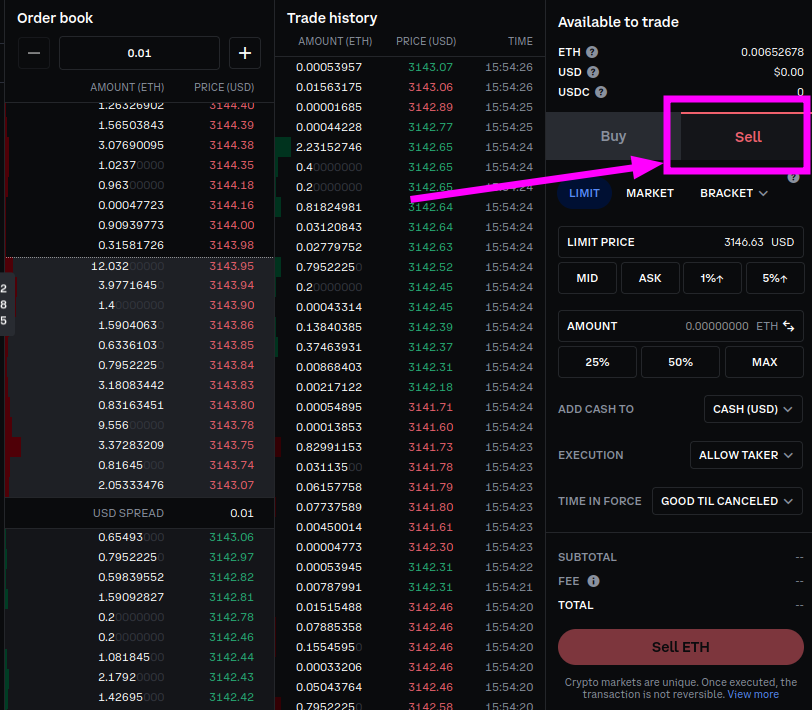
To set both your TP and SL on Coinbase (again, others may differ), you’ll have to ensure that “Bracket” is selected from the drop-down:
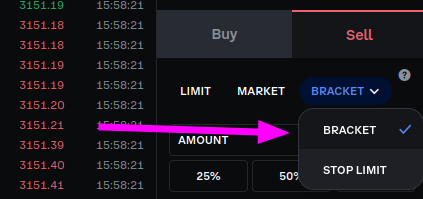
This will now give you the options you need.
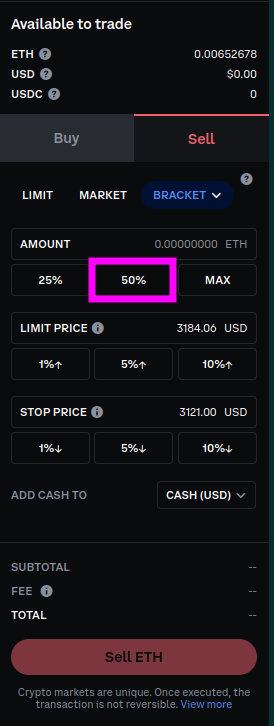
First, select the amount you want to sell. I’ll select 50% here since we expect to sell 50% at our target:
Now, select your “Limit Price”. This will be your Target Price. You will have to type it in manually according to whatever you see stated under the “Potential Target(s)” column of my spreadsheet. Since we are currently not trading Ethereum, let’s pretend that we pulled a target of $3200 from the tracker:
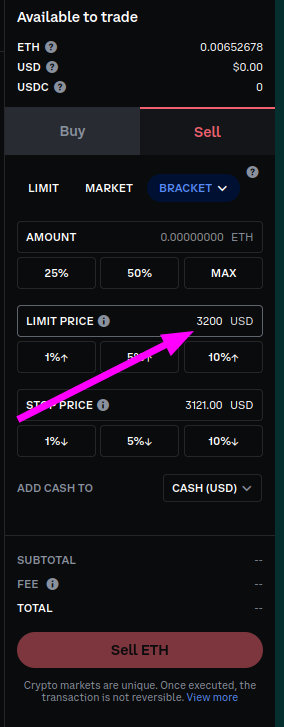
Once price hits the TP of $3200 or better it should begin to execute and your Stop Price would be removed. But we also need to set that Stop Price in case the trade moves down rather than up and we want to minimize our losses. You’ll find this Stop Price under the “Stop Limit” column of my tracker. Let’s pretend that this price was $3100. Type that in here:
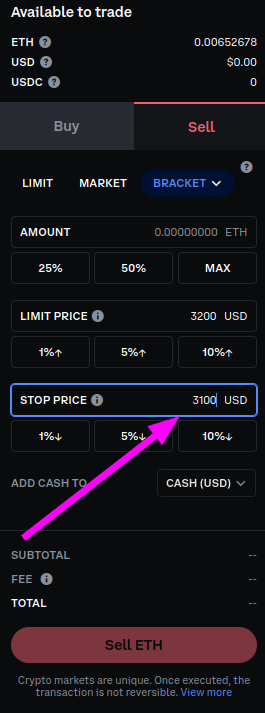
So now, if price drops, your order should attempt to execute at the $3100 price point. It is important to note that during extremely volatile movements, you may not get exactly that price in sale. The price is simple the trigger to begin execution of the order.
Now, enter the order.
Okay, but that only takes care of 50% of it right? Yes. So, we want to protect 100% of our trade against losses; therefore, we are going to have to enter one more order to protect against losses on the remaining 50% of the trade. In this case, you’ll want a “Stop Limit” Sell order. You’ll then see the options to enter your “Stop Price”, “Limit Price”, and “Amount”.
The stop price is essentially the trigger price. This is when your order starts to execute. The limit price is the price you want to receive for your asset. In this case, I don’t want the order to execute until we hit $3100 and I’d like to sell the asset for a price of $3000 or more on my remaining 50%.
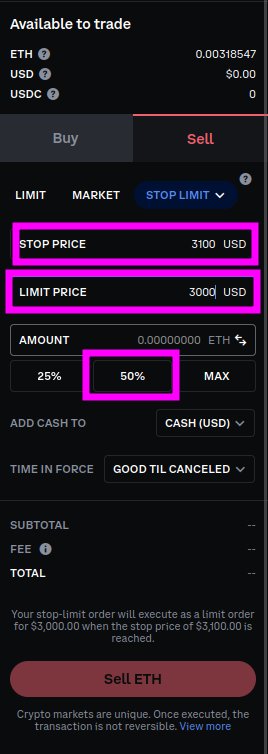
Enter your order. Done.
We’ve now created two orders. The first will sell 50% upon hitting our target price, or stop out 50% upon hitting our stop limit. And the second will take care of the remaining 50% if that stop limit is hit.
The only other thing you’ll have to do is figure out when and where to sell the remaining 50% once you make it to floating profit. You have options but I generally suggest that you move that stop limit up after hitting the first target. I like to move it up at least halfway. So, essentially your going to have to cancel the old Stop Limit Sell order and create a new one with the modified price of your choosing.
You could also wait for my exit alert (not recommended). I will post when I have exited a trade completely. I wouldn’t recommend relying on this method because my alerts can be delayed. Sometimes stop limits are hit at night while I am sleeping and I can’t post the notification until the next day. Therefore, you kinda have to stay on top of your own orders. Some services provide trailing stop options and you can also get automated trailing stops through third-party services like 3commas. I generally don’t recommend API services to your exchange due to security issues.
One more last thing. I know this can be a bit intimidating for beginners. I am still intimidated on larger orders myself. I’d recommend practicing on small orders so that you don’t make a mistake and lose big money. Once you feel comfortable with the process and have witnessed how it works, move on to larger orders.
I hope this little tutorial has helped. Let me know in the comments or via private message if you have further questions.
✌️ Stew
Keep reading with a 7-day free trial
Subscribe to Stewdamus' Chart Analysis to keep reading this post and get 7 days of free access to the full post archives.